Subscribe for updates
Exploring the Power of Equalization in Audio Production
If you’ve been around audio and video production for any length of time you know that there is one audio production tool stands as a cornerstone of the craft: EQ, short for Equalization. EQ plays an indispensable role, especially when harmonizing voiceovers with music. You may already know but EQ is the process of adjusting the amplitude of specific frequency bands within an audio signal. EQ can range from a simple to a complex, but it undeniably holds the top spot in processing voiceovers, music, and sound effects for various media, from TV and radio commercials to explainer videos, eLearning modules, and internal corporate training materials.
Now, as a professional voice actor who is heavily involved in audio production, I find myself reaching for EQ regularly. In this article, I want to share my favorite EQ plugin as well as how I employ EQ to ensure that different audio signals harmonize seamlessly.
We have a limited frequency range of what we can hear. And when you have multiple audio elements covering the same parts of the frequency spectrum, it’s essential to make room for the most crucial parts and avoid auditory chaos. Here are the three primary ways I use EQ to make it happen.
Fine-Tuning the Voiceover
First and foremost, I utilize EQ to fine-tune the voiceover itself, ensuring that voice and music aren’t fighting over frequencies and that the one of the VO sits nicely in the context of the project. This is not always necessary and I typically do NOT EQ raw files that I send to clients. But in production, this process helps achieve the ideal sonic balance within the mix.
Taming Troublesome Frequencies
The second way I like to use EQ is by employing a Dynamic EQ, which is a versatile tool that aids in managing specific frequencies that sometimes become overly pronounced, such as sibilance without just cutting those frequencies out of the entire signal. Dynamic EQ offers precision and customization, making it my preferred choice over a traditional de-esser.
Creating Space with Opposing EQ
Lastly, I employ opposing EQ on competing audio signals. This usually involves removing select frequencies from the music while simultaneously boosting the same frequencies in the voiceover. This technique prevents the voice from getting buried in the music AND makes it so that you can do minor tweaks in EQ rather than giant cuts.
My Go-To EQ Tool
Throughout my career, I’ve had the pleasure of experimenting with a wide array of EQ plugins. While they all serve the same fundamental purpose, the differences in speed, features, and effectiveness can be significant. Among the plethora of options, one plugin has consistently stood out for me and has become my go-to EQ: Izotope’s Neutron, specifically Neutron 4.

Neutron 4 is not just your average EQ plugin; it’s part of a comprehensive mixing suite. The plugin suite consists of a mothership plugin that contains seven distinct modules, all of which can function as standalone plugins…which is great.
We’ll primarily focus on the EQ section, but Neutron 4 offers a treasure trove of features beyond EQ that are worth exploring.
Neutron 4 excels in each of the EQ scenarios I mentioned earlier, which is why it’s my one-stop EQ solution for various audio projects. At the end of the day, I choose to use Neutron because it is massively powerful, feature-packed, intuitively layed out and consistently sounds good.
Let’s delve into its capabilities:
Single-Track EQ Mastery

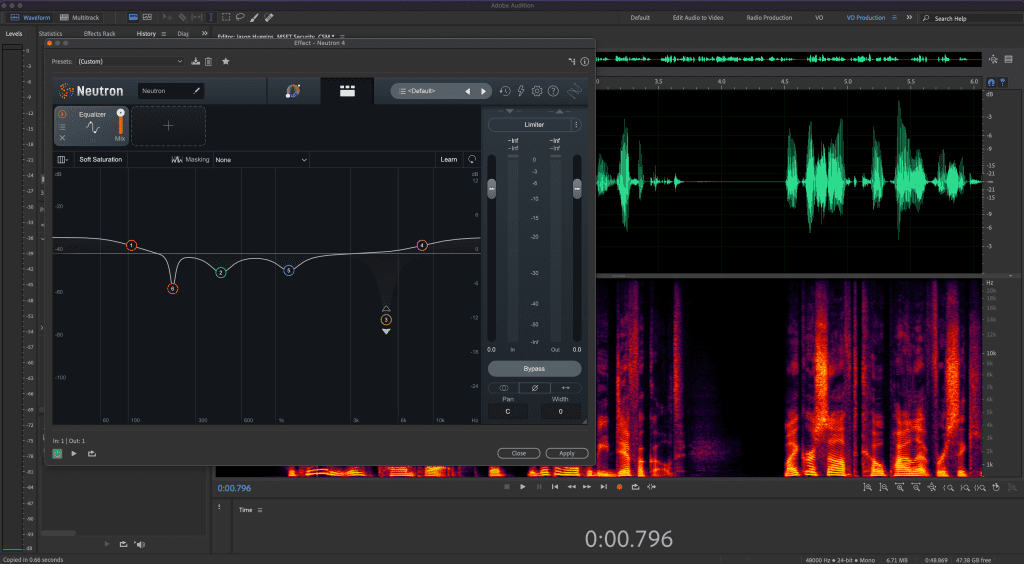
Neutron 4’s single-track EQ is a powerhouse, packed with useful features. Laid out as a parametric EQ, it allows you to add up to 12 frequency nodes, adjust the amplitude of those frequencies, and fine-tune the width of the frequency band (known as Q). While these features alone are impressive, what sets Neutron apart is its flexibility: each node can function as either a standard EQ band or a dynamic EQ band. Furthermore, the dynamic EQ can be used with a sidechain, meaning the threshold for dynamic EQ can be triggered by an external source, providing surgical precision in controlling troublesome frequencies.
Here’s where Neutron gets even more fascinating for voiceover work. Not only does it provide top-notch EQ capabilities, but it also boasts built-in AI. This AI allows you to automate the selection of frequencies to optimize your audio signal. While it may not always be flawless, it serves as stellar starting point for audio enhancement. Simply add a node or two, adjust the amplitudes in the desired areas (you can even modify multiple nodes simultaneously), and click the “learn” button while playing back your audio. The plugin will automatically fine-tune the frequencies of the nodes to optimize your signal and then you can tweak from there.
Multitrack Magic

Where Neutron shines is when it’s integrated into a multitrack environment. Whenever I’m working on a project that involves both music and voice, I make it a point to add Neutron 4 to every channel I’m working on. This is where the magic happens.
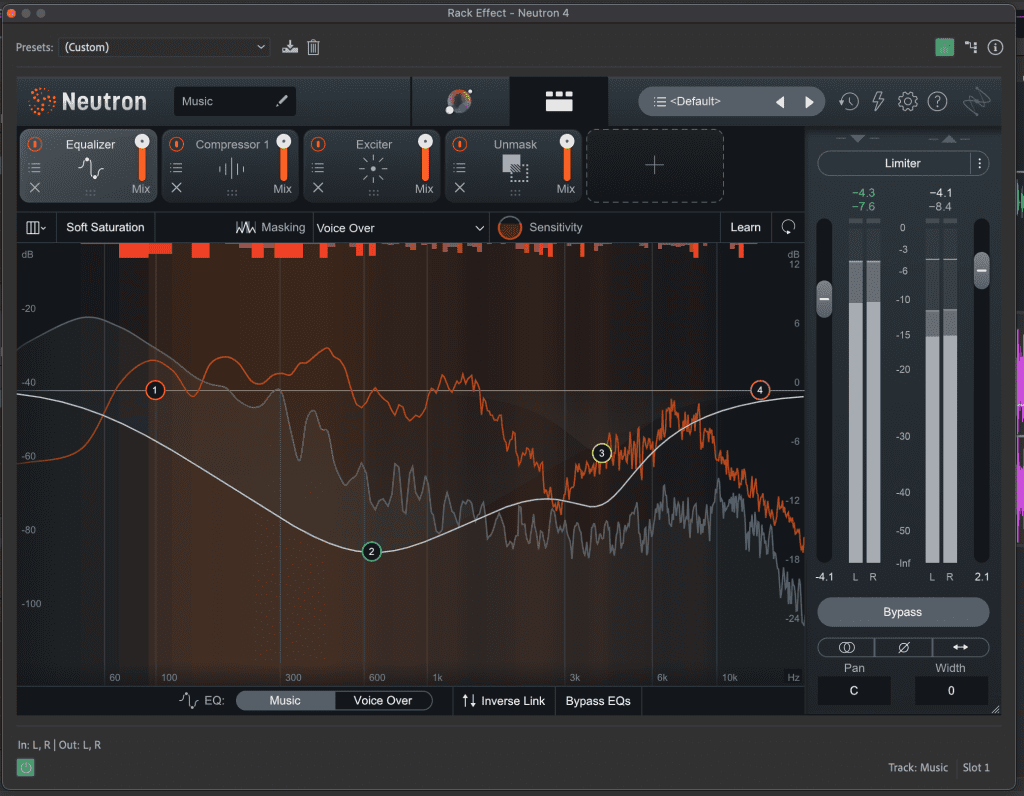
I label the EQ instance for the voice as “Voice” and the one for the music as “Music” or whatever makes sense for the context of my mix. After you edit the labels, it’s easy to visualize how these tracks’ frequencies interact with one another. By selecting a track containing a Neutron instance from the “Masking” dropdown menu and playing back the audio, you’ll get a visual representation of where the frequencies are competing.

Stellar Features
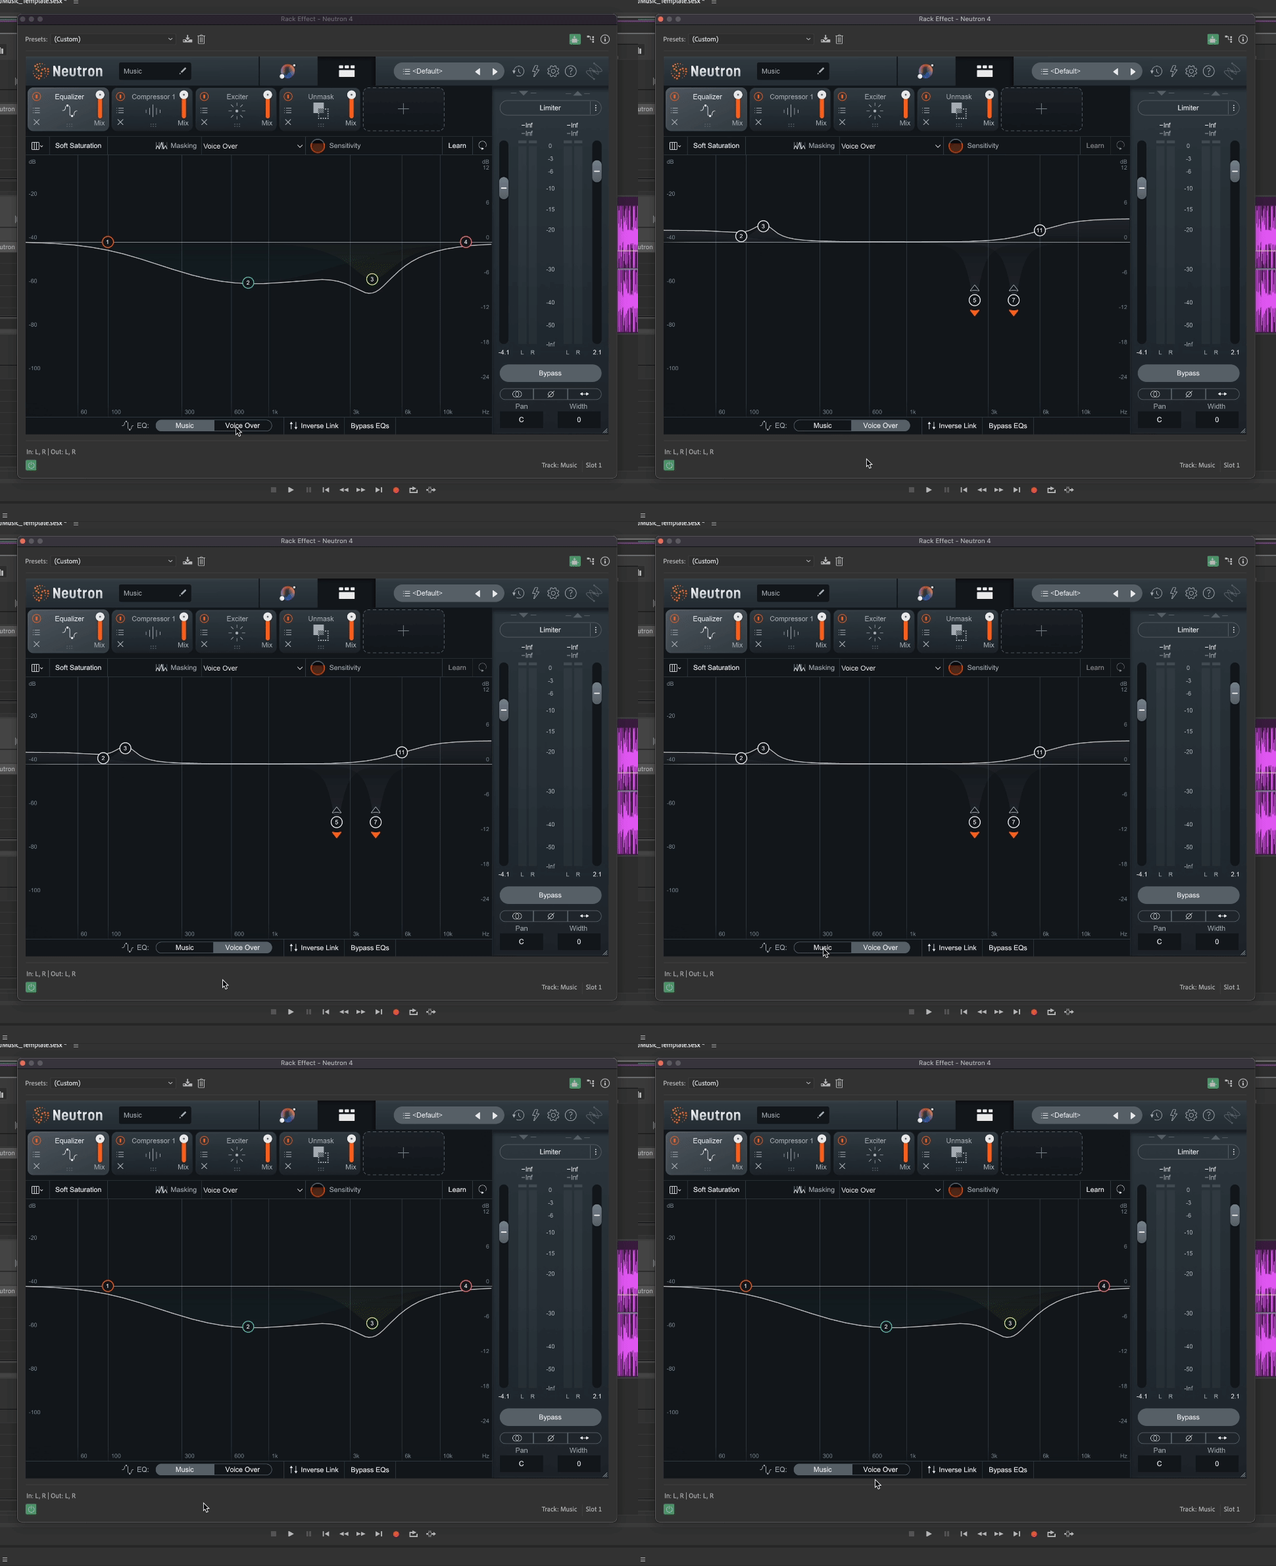
At this point, you can either reduce frequencies in the music to create space or opt for the “Inverse Link” feature, which automatically applies the inverse of any adjustments made on one signal to the other (for example, reducing a specific frequency in the music will increase that exact same frequency in the voice by the same amount).

What’s more, you don’t need to jump back and forth between multiple windows while EQing, because the channel you have selected in the Masking dropdown is accessible within the same EQ window by clicking its corresponding name at the bottom of the plugin. The interface is really streamlined and makes it super easy to fine-tune the interplay between audio signals.

Unmask Module
Although we’ve primarily been talking about Neutron’s EQ section, it’s worth mentioning that Neutron offers additional modules, such as compressors, exciters, transient shapers, sculptors, gates, and an especially useful module called Unmask. When you connect instances of Neutron via the Masking dropdown and add the Unmask module, you can create a dynamic EQ that intelligently lowers one signal beneath another at the frequencies where they clash.

Now if you use it too heavily this sounds really unnatural, but if you keep the sensitivity and the mix (percentage) at reasonable levels, you can automate much of the mixing of music and voice over. Start with a little Unmask and then add EQ to fine tune it. Just don’t overdo it. Striving for a natural sound is typically the goal.
Wrapping it Up
Izotope’s Neutron 4 is a game-changer for audio professionals. It offers a comprehensive and user-friendly solution that extends beyond just EQ. And the AI features and seamless integration in multitrack environments make it a powerful tool for achieving polished, balanced, and professional audio content. Whether you’re a media producer or an engineer, Neutron 4 is a versatile asset that can elevate your audio production.

Bonus Tip: Unlocking Great Deals on Izotope Products
If you’re eager to get your hands on Neutron and other fantastic Izotope products without breaking the bank, here’s a strategy to snag great deals. While I can’t guarantee these prices, I have seen these tools consistently on sale and with patience you should be able to get a deal!
First you are going to create Izotope and Sweetwater accounts and sign up for their sale emails. Also, grab a free tool from Izotope (like AudioLens or Vinyl…it doesn’t matter). You are doing this so that you are seen by Izotope as a “Customer” who has purchased something in the past and someone who is eligible for Loyalty Offers.
Now it’s a waiting game. Just keep an eye on the sales and when Black Friday or Christmas roll around you will likely see a good Elements bundle (usually from Sweetwater) for around $29. I have seen it as low as $9! Snag that and start watching your inbox for Upgrade offers.
Your purchase path is going to come down to what you need. I got Elements for $9, upgraded to Izotope’s Music Production suite for like $299 and then got the Everything Bundle for $199. It took a little bit of time, but that is $2500 worth of tools for just over $500. Like I said, I can’t guarantee these prices, but patience can pay off if you want these tools.
I hope this article has provided you with valuable insights as you navigate the exciting world of media production. Best of luck on your journey to excellence in this ever-evolving field!
- Create an Izotope Account and Get a Free Tool: Begin by creating an Izotope account and downloading one of their free tools. Currently, I would grab AudioLens, a tool that allows you to play any audio on your computer and create a reference for automated mixing with Izotope tools (only).
- Subscribe to Izotope’s Updates: Sign up for Izotope’s updates newsletter. Subscribing after obtaining a free tool, like AudioLens, will put you on their radar for Loyalty Offers. Izotope frequently extends special deals to loyal customers, so this step is crucial.
- Register for Sweetwater’s Emails: Create an account with Sweetwater and subscribe to their sale emails. Sweetwater often sells Izotope plugins, and sometimes their bundle deals on Elements Suites are even more enticing than those offered directly by Izotope (e.g., RX, Ozone, Neutron Elements Suites for $29).
- Patience and Timing: Now, it’s a waiting game. Keep an eye on your inbox, especially during big sale events like Black Friday and Christmas. You’ll frequently come across deals for RX Elements from Izotope or Elements (with RX and Neutron or Ozone) bundles from Sweetwater at incredibly low prices. I’ve seen as low as $9 but more commonly around $29. When you spot such a sale, snag it.
- Upgrade Deals: After acquiring Elements, be on the lookout for upgrade sales. Izotope can be pretty aggressive with upgrade deals. If you’re interested in upgrading to RX Standard only (without the need for other tools), wait for the RX Upgrade deal, which typically costs around $99. This puts you under $150 for a tool that retails at $400. Winning!!
- Bundle Bonanza: If you’re considering both RX Standard and the full Neutron, keep an eye out for the Music Production Bundle or Mix & Master Bundle, usually priced around $249 or $299. This represents an incredible value for less than $500. For the most ambitious deal seekers, watch for the Everything Upgrade Bundle (if you already own the Music Production Bundle), at an astonishing steal of $199. Normally priced at $2499, this upgrade path unlocks every tool Izotope offers, plus some additional handy tools, for less than $700.
While this strategy may provide more options than you need (or drive you down a GAS rabbithole), by staying attentive to sales and exercising patience, you can secure incredible deals on the tools that will elevate your audio production to the next level.
I hope this has been helpful for you as you continue to pursue a path of excellence in the crazy world of media production. Chat soon!


